


+86 13586865656
The Ultimate Guide to Cleaning Fountain Pens: Keep Your Pen in Top Shape
The Ultimate Guide to Cleaning Fountain Pens: Keep Your Pen in Top Shape
Fountain pens offer a writing experience that’s unparalleled—smooth, consistent ink flow, and a touch of elegance that no ballpoint can match. However, to maintain that flawless performance, regular cleaning is a must. Over time, ink residue, dust, and debris can clog the nib, disrupt ink flow, and even damage your prized pen if not properly maintained. But don’t worry; with a little know-how, you can keep your fountain pen in top condition for years to come.
In this guide, we’ll break down everything you need to know about cleaning your fountain pen—why it’s important, how to do it, and some helpful tips and tricks to make the process as easy as possible.
Table of Contents
- Why You Should Clean Your Fountain PenWhen Should You Clean Your Fountain Pen?
- Personal Experience: My Journey with Fountain Pen Cleaning
- Essential Materials for Cleaning Your Fountain Pen
- Step-by-Step Guide to Cleaning Your Fountain PenAdvanced Cleaning Techniques for Stubborn Ink
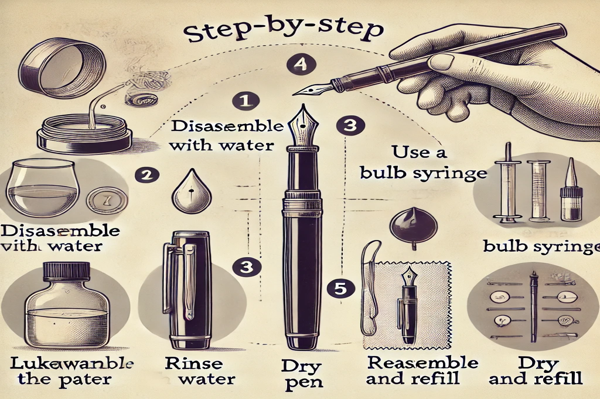
- Step 1: Disassemble the Pen
- Step 2: Rinse the Pen with Water
- Step 3: Use a Bulb Syringe (Optional)
- Step 4: Dry the Pen
- Step 5: Reassemble the Pen and Refill
- Troubleshooting Common Fountain Pen Issues
- Maintaining Your Fountain Pen Between Cleanings
- Conclusion
Why You Should Clean Your Fountain Pen
A fountain pen is a delicate mechanism that relies on capillary action to move ink from the reservoir to the nib. This means that anything disrupting the ink flow can cause problems like skipping, inconsistent writing, or even complete ink failure. The most common culprits are dried ink, ink residue, or small debris blocking the feed.
By regularly cleaning your pen, you prevent these issues and ensure the smooth, uninterrupted writing experience that fountain pens are famous for. Think of cleaning your pen as an investment in its longevity and performance. Regular maintenance can help you avoid expensive repairs or replacements down the line.
Personal Experience: My Journey with Fountain Pen Cleaning
When I first started using fountain pens, I didn’t realize how important cleaning was. My pens would often skip or dry out, and I’d get frustrated trying to fix it. After some trial and error (and a few YouTube tutorials), I realized that a little regular cleaning went a long way. Now, I make it a point to clean my pens every month, and I’ve noticed a massive improvement in ink flow and overall performance. Plus, cleaning becomes part of the ritual of owning a fountain pen, almost like a form of self-care!
When Should You Clean Your Fountain Pen?
The frequency with which you clean your fountain pen depends on a few factors:
- Ink Type: Thicker inks, shimmering inks, or pigment-heavy varieties require more frequent cleaning. Pigment inks, in particular, can clog up your pen quickly.
- How Often You Write: If you use your pen daily, cleaning once every 1-2 months is typically sufficient. However, if your pen is left unused for long periods, you might need to clean it more often.
- Changing Ink Colors: Always clean your pen when switching ink colors to avoid mixing and contamination. The last thing you want is a pen that writes in an unintentional shade!
If you start noticing skipping, dry starts, or a decrease in ink flow, it’s time to clean your pen. Regular cleaning can help you avoid these performance issues before they become serious.
Essential Materials for Cleaning Your Fountain Pen
Before you begin, you’ll need a few basic supplies to get the job done:
- Lukewarm Water: Tap water is fine in most cases, but if you live in an area with hard water, distilled water is a safer choice to avoid mineral buildup.
- Soft Cloth or Paper Towels: For drying the pen.
- Small Container or Cup: For soaking the pen or holding the cleaning water.
- Bulb Syringe (Optional): A handy tool to flush water through the feed with extra pressure if needed.
- Pen Flush (Optional): For tougher cleaning jobs, especially if you’re dealing with stubborn dried ink.
Personal Tip: Distilled vs. Tap Water
I learned the hard way that tap water with a lot of minerals can leave buildup inside the pen, especially in the nib and feed area. After switching to distilled water for cleaning, I noticed fewer issues with clogging. It’s a small change that’s made a big difference!
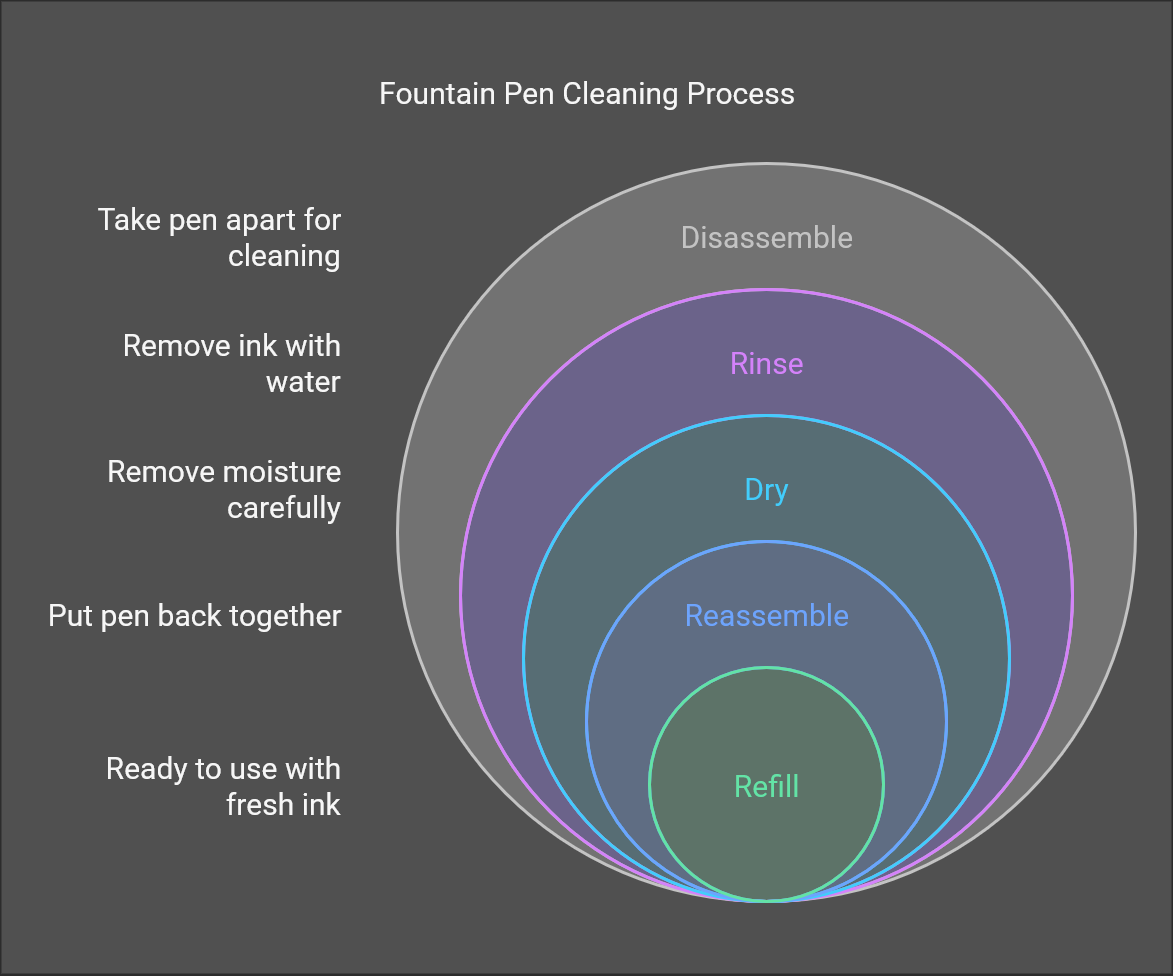
Step-by-Step Guide to Cleaning Your Fountain Pen
Cleaning your fountain pen doesn’t have to be complicated. Follow these simple steps to keep your pen in great shape:
Step 1: Disassemble the Pen
First, remove the cap and inspect the nib and feed for visible ink residue or debris. Then, unscrew the barrel from the section (the part that holds the nib). Depending on your pen’s filling system, you may need to remove either the ink cartridge or the converter.
Tip: Avoid disassembling the nib and feed unless you’re confident in doing so—removing these parts can be tricky and could potentially damage your pen.
Step 2: Rinse the Pen with Water
For pens using a converter or piston filling system:
- Fill a container with lukewarm water.
- Submerge the nib and feed into the water.
- Operate the converter as you would when filling it with ink, drawing water through the feed and expelling it. Repeat until the expelled water runs clear.
For cartridge-based pens:
- Remove the empty cartridge.
- Rinse the nib and feed under lukewarm water or submerge them in a container of water.
Step 3: Use a Bulb Syringe (Optional)
If you’re dealing with stubborn ink or debris, a bulb syringe can help. Fill it with water and direct the nozzle toward the section (where the nib and feed are). Gently squeeze the bulb to force water through the feed, helping to flush out any ink residue.
Step 4: Dry the Pen
Once the pen is thoroughly cleaned, use a soft cloth or paper towels to gently blot the nib and feed. Be sure not to apply too much pressure—fountain pens have delicate nibs that can easily be bent or damaged.
Allow the pen to air dry completely before reassembling it. Depending on humidity and the amount of water used, this could take several hours.
Step 5: Reassemble the Pen and Refill
Once your pen is dry, reassemble it by attaching the cartridge or converter and then screwing the barrel back onto the section. You’re now ready to refill the pen with fresh ink!
Advanced Cleaning Techniques for Stubborn Ink
Sometimes, regular cleaning isn’t enough to remove stubborn ink residue. In these cases, a specialized pen flush solution can help. You can buy commercial pen flush products, or you can make your own at home by mixing one part ammonia (5%) with nine parts distilled water.
Warning: Ammonia can be harsh and may damage some pen materials, so always check if it’s safe for your specific pen before using it.
A gentler alternative is to mix a small drop of dishwashing liquid with warm water. This solution is effective for most modern fountain pens and is less aggressive than ammonia-based solutions.
Troubleshooting Common Fountain Pen Issues
Even with regular cleaning, some issues may persist. Here’s what you can do:
- Inconsistent Ink Flow: If your pen still skips or has trouble starting, you may need to repeat the cleaning process or check the nib alignment.
- Ink Leaks: Make sure all parts are completely dry before reassembling. Any leftover moisture can dilute the ink and cause leaks.
- Persistent Dried Ink: If your pen’s ink flow is still obstructed, leave the nib and feed in water for up to 24 hours to dissolve the ink. If that doesn’t work, a deeper cleaning with pen flush might be necessary.
Maintaining Your Fountain Pen Between Cleanings
While cleaning your fountain pen is essential, there are a few things you can do to keep it in good shape between cleanings:
- Store it Properly: Always store your fountain pen with the nib pointing upward to prevent ink from drying out in the nib.
- Use Your Pen Regularly: Regular writing helps keep the ink flowing through the feed, preventing clogs and ink drying.
- Choose the Right Ink: Avoid using pigment or drawing inks in fountain pens unless they’re specifically designed for it. These inks can clog your pen and are harder to clean. Instead, opt for water-based or dye-based inks, which flow more easily and clean up better.
Conclusion
Cleaning your fountain pen is a simple yet crucial step in maintaining its performance and longevity. By following the steps outlined above and keeping a regular cleaning schedule, you can ensure your pen continues to write smoothly for years to come. Whether you’re using a converter, cartridge, or a vintage fountain pen, regular maintenance is key to enjoying the luxurious writing experience that only a fountain pen can provide.
Now that you’re equipped with the knowledge to clean your fountain pen, why not go ahead and give it a try? Your pen—and your writing—will thank you for it!
For more tips on fountain pen care, check out this comprehensive guide.